Before you start working with R:BASE, take some time to get acquainted with its menus and other features. Learning the basic techniques of using R:BASE now will make it easier for you to complete the lessons that follow.
Here's what you'll learn about navigating in R:BASE:
•Starting and leaving R:BASE
•Getting help
•Using special features in R:BASE
Starting R:BASE
Start R:BASE from the Windows Operating System Desktop. Double-click the "R:BASE 11" icon. Before you start working on the lessons, familiarize yourself with the R:BASE 11 window, which has six major parts: the Menu Bar, Toolbar, Group Bar, Work Space, Status Bar, and Property Bar, as shown below:
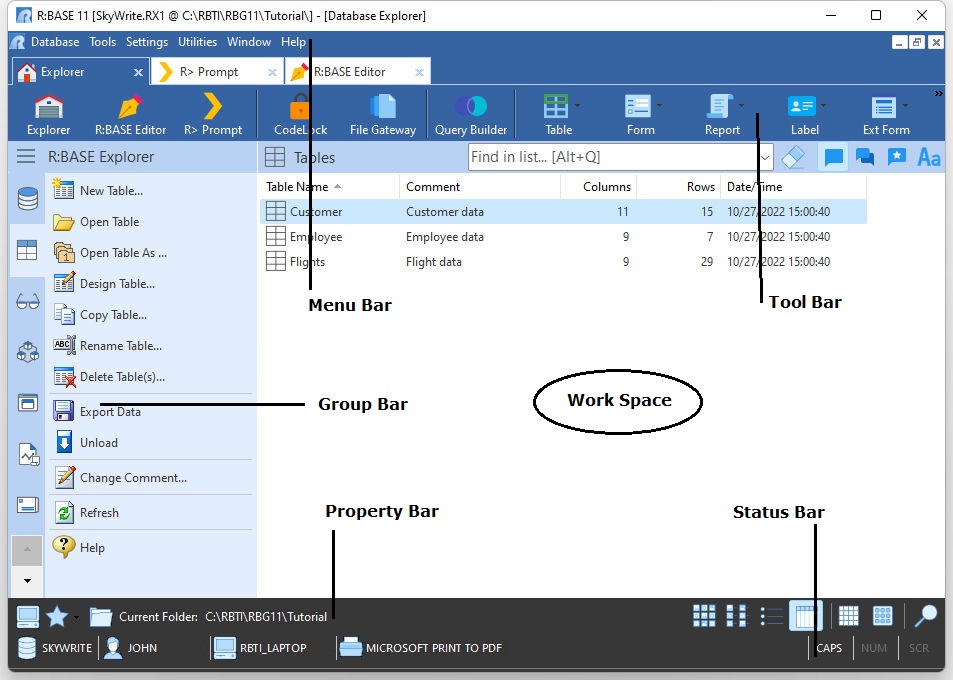
The R:BASE 11 Work Space area can be used to work in the Database Explorer (above), R:BASE Editor, R> Prompt, Data Designer, Query Builder, Report Designer, Form Designer, Label Designer, Application Designer and External Form Designer.
R:BASE Windows
The R:BASE program starts and displays the R:BASE 11 "window". As you work with R:BASE, other parts of the program are displayed in "windows" within the R:BASE 11 "window". You can have many windows open at a time, and you can have many "R:BASE 11" session windows open at a time.
As with all Windows programs, the R:BASE 11 window can be maximized-set to encompass the entire screen; normalized-sized to be displayed on just part of the screen, or minimized-reduced to an icon. The windows displayed within the R:BASE 11 "window" can also be maximized, normalized, and minimized. They always remain within the "R:BASE 11" window. The title bar of the active window (the one in which you are working) is a different color than the title bars of the other windows. Refer to your Windows documentation for more information about working with windows.
The Database Explorer
The Database Explorer provides fast access to the features of R:BASE. From the Database Explorer you can create and modify databases, applications, tables, views, forms, reports, labels, and more.
The Database Explorer has three main parts: the Group Bar which is the panel on the left which shows options (e.g. Databases, Tables, Views, etc.) that correspond to the area in which you are working, the Work Space which is a list of existing objects for this area (such as a list of tables or a list of forms), and the Property Bar which displays your current folder location, folder options, and settings to alter your view of the objects in the Work Space. You'll use the Database Explorer options to start most of the lessons.
R:BASE Commands and Functions
R:BASE Commands and Functions provide access to the most powerful features of R:BASE. Rather than choosing a menu command, you enter an R:BASE command in the R> Prompt window, shown below:
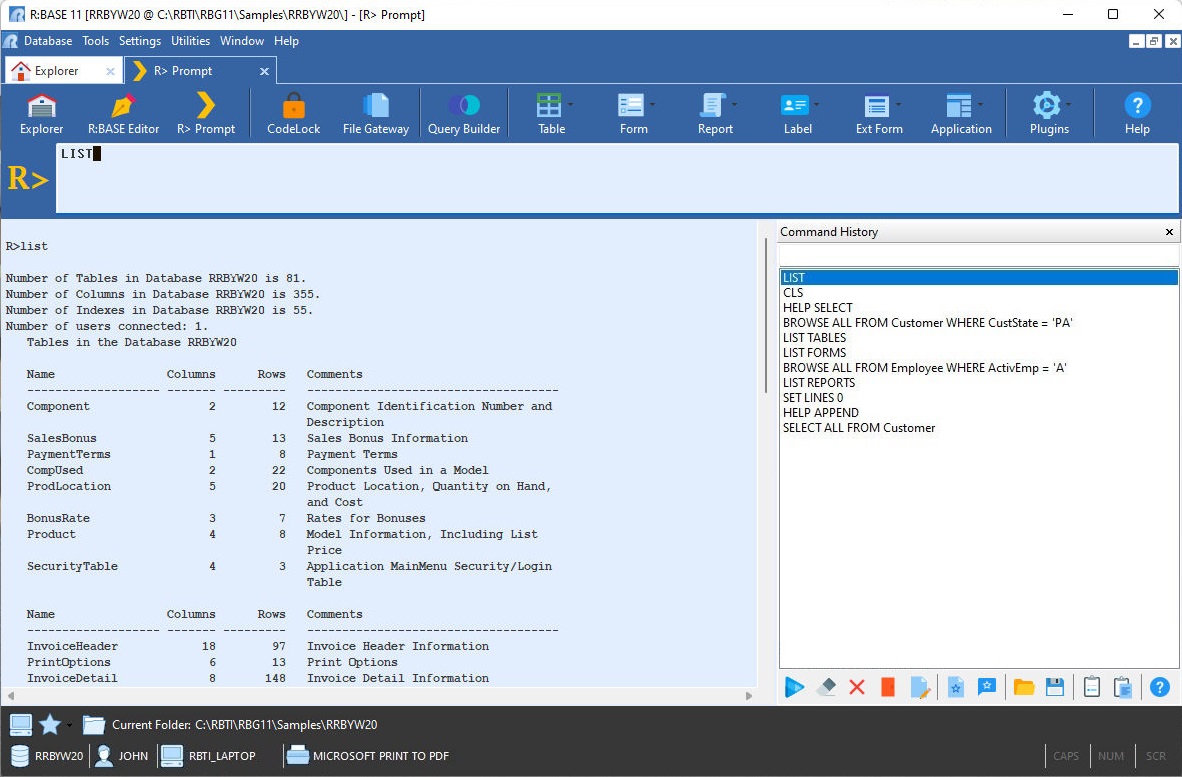
The R> Prompt is an alternative way to use R:BASE-you can perform most activities using menu command and the Database Explorer. You don't have to be a programmer to use R:BASE commands, we'll be using some of them in the lessons in this tutorial. For a complete description of R:BASE commands and their syntax, refer to the "Command Index" within the Inline Help [F1].
R:BASE built-in functions perform common programming tasks, such as finding the square root of a number or combining two strings. Specifically, a function is a predefined complex expression to which you pass one or more values and which returns a single value. R:BASE provides the following categories of commonly used functions:
•Arithmetic and Mathematical
•Conversion
•Date and Time
•Financial
•Keyboard and Operating System
•Logical
•String Manipulation
•Trigonometric
•User Defined (UDF's)
For a complete description of R:BASE functions and their syntax, refer to the "Function Index" within the Inline Help [F1].
Special Features
R:BASE displays several other features used to complete tasks. These include:
•Menus
•Dialog boxes
•Where Builder
•Hints
•Handlebars
•Lassoing
Menus
R:BASE 11 provides a standard Windows menu. As you use R:BASE 11, you'll notice that the available menus change depending on your current activity. For instance, if you are working with the Forms Designer, new menus appear, Database Controls, Variable Controls, and more. The options in each menu also vary accordingly. For more information about each menu and menu option, refer to online Help.
Dialog Boxes
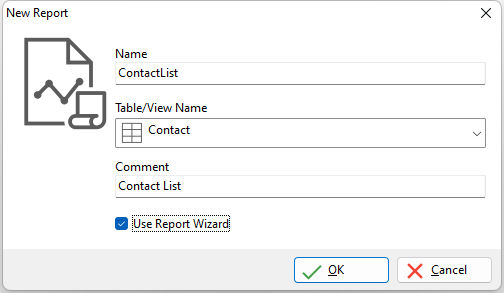
R:BASE displays a dialog box when it needs more information about the work you are doing. For example, when building a new report you enter the necessary information about the report, such as report name and description, in a dialog box. Use the mouse or the [Tab] key to move between fields in a dialog box. You must complete the information in a dialog box before continuing on with the task.
Where Builder
For several tasks, you can set conditions for the selection of rows from a table or view. When a task includes this process, R:BASE provides you with an aid called the Where Builder.
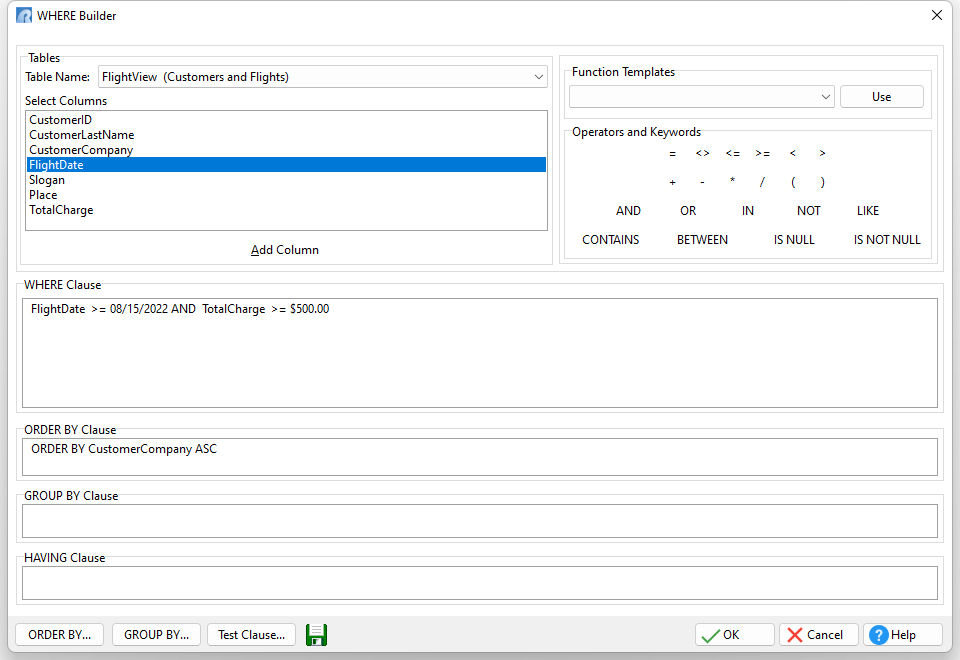
The Where Builder walks you through the process of defining one or more conditions. As you make each choice, R:BASE displays it so that you can see the condition as you're putting it together.
Hints
Small hint bubbles will appear above icon picture buttons throughout the R:BASE for Windows program when you hover your mouse cursor over them. These hints will inform you of the name of the button. The hints are especially helpful in the Form Designer, Report Designer, and Label Designer.

Handlebars
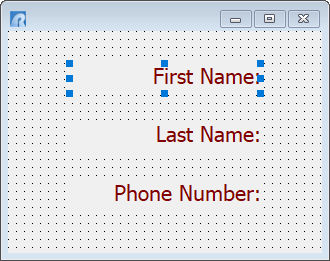
In the Form Designer, Report Designer, and Label Designer there are objects which can be placed. When a field object is selected, small blue circles appear around the four corners and four sides. These circles are called handlebars.
When more than one object is selected, the red squares will be displayed.
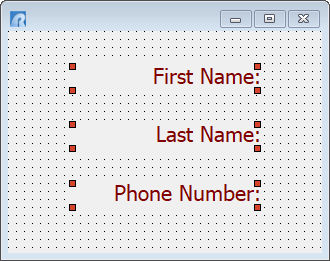
These handlebars are extremely useful for editing the properties of more than one object or moving more than one object. Hovering your cursor over the handlebars for an individual object changes the pointer to a double arrow. Holding down the left mouse button with the double arrow lets you stretch or shrink the field.
Lassoing
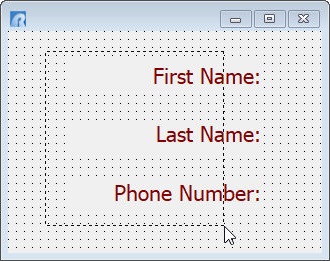
Within a form, report, or label, you can select multiple objects with the mouse cursor by lassoing objects. The lasso appears as a dotted line while you drag the mouse cursor. It works by starting in one corner of the work space, holding down the left mouse button, and dragging the cursor to the opposite corner. The lasso only needs to be touching the object in order to select it for editing. When lassoing multiple objects that are contained within a parent object, such as a panel, press and hold the [Ctrl] key to lasso the objects.
Documentation
This section discusses the documentation and conventions for this tutorial.
Manual Conventions
The following conventions identify specific types of information.
Convention |
Example |
Type of Information |
Bold type |
File: Print |
Names of menus and menu commands |
Italic type |
tblname |
Names of variables, arguments, options, names (columns, tables, databases, and so on) and documentation |
All caps |
RBENGINEX5.CFG |
Names of commands, keywords, directories, and files |
Bracketed words |
[Page Up] |
Names of keys on the keyboard |
Courier font |
SET BELL ON |
Examples of R:BASE code |
Quotation marks |
"Print" dialog box |
Names of dialog boxes, windows, and options |
Mouse and Hot Keys
While working with R:BASE 11, you have the choice of using a mouse or key combinations, hot keys, to choose menu commands and options. Procedures in the online Help generally describe how to perform tasks using a mouse. However, certain actions are only available by using a hot key. The various modules of R:BASE have specific hot keys that only work in that module, or have different results across the modules.
Getting Help
Getting help in R:BASE is easy: choose Help: Contents, press [F1], or click the Help button on the tool bar. Any of these options open the Inline Help. In addition, you can open the Inline Help specific to the task you are working on by pressing [Shift]+[F1] or by clicking the Help button in a dialog box. Inline Help opens in a separate window. Leave the Help window open for additional reference while you complete your task in R:BASE. The Inline Help is continuously being updated as new features and commands are implemented and when corrections are made.
The Inline Help includes the following types of information:
•How To section for each major portion of R:BASE
•Reference Topics for performing common tasks
•Reference commands for R:BASE commands, functions, and data types
•Description of tool bar buttons, hot keys, and menu commands
•Context-sensitive help describing R:BASE dialog boxes and windows
Additional Resources
| 1. | PDF Documentation |
•All_About_the_CHOOSE_Command.pdf
•All_About_the_DIALOG_Command.pdf
•All_About_the_PAUSE_Command.pdf
•All_About_the_PRINT_Command.pdf
•CommandIndex.pdf
•DatabaseMaintenance.pdf
•FormsManual.pdf
•FunctionIndex.pdf
•GainingSpeedWithProgramming.pdf
•HowToManual.pdf
•ProblemSolvingInRBASE.pdf
•ProgrammingInRBASE.pdf
•RBASE_11_forWindows_DatabaseConversionGuide.pdf
•RBASE_11_forWindows_GettingStartedGuide.pdf
•RBASE_11_forWindows_QuickInstallationGuide.pdf
•ReferenceIndex.pdf
•Tutorial.pdf
•WhatsNewIn_RBASE_11_forWindows.pdf
| 2. | R:BASE 11 for Windows - Sample Applications: |
We have spent many hours to provide users with samples to demonstrate the use of each and every control and/or function in R:BASE 11 for Windows. Please make sure to go through all the sample applications to explore the possibilities of R:BASE 11. From your operating system desktop, you should see a RRBYW20 shortcut for running the "Running R:BASE Your Way Sample Application (Part 20)"
| 3. | R:BASE 11 Home Page: https://www.rbase.com/rbg11 |
| 4. | From The Edge: http://www.razzak.com/fte |
| 5. | R:BASE Support: https://www.rbase.com/support/ |
| 6. | Training and Education: https://www.rbase.com/training/ |
| 7. | More samples to demonstrate R:BASE features: http://www.razzak.com/sampleapplications |
| 8. | Online Syntax: https://www.rbase.com/support/rsyntax/ |
About this Tutorial
This tutorial introduces R:BASE to new users. The manual is designed for people who have a basic knowledge of their computer's operating system, but who have no experience creating R:BASE databases and applications. Those who have used R:BASE applications created by others or have worked with other database software will also find this manual useful.
What You Will Learn
Each lesson covers a single subject. Each lesson in this manual builds on previous lessons. You should complete them in order. When you have finished the lessons, you will have created a complete R:BASE database and application.
In each lesson you will learn how to save your work. It is important to save your work frequently to avoid losing changes, should your computer unexpectedly lose power.
The lessons in this manual teach you how to:
•Design a database
•Create a database and modify the structure
•Look at information in the database and create a view
•Create forms for data entry
•Create reports for printing data
•Create mailing labels
•Using R:BASE commands
•Writing command files
•Create and use an application
•Maintain the database
Sample Files
The Tutorial contains the following sample files:
•SkyWriteSample.RX1
•SkyWriteSample.RX2
•SkyWriteSample.RX3
•SkyWriteSample.RX4
•SKYDATA.BAK
•ChargesByDateRange.rmd
•SkyWriteAppSample.RBA
•SKYWRITE.JPG